
Using PyTorch DataLoaders to Streamline Multimodal Data
Learn how PyTorch's DataLoader streamlines deep learning pipelines by efficiently loading and shuffling data in batches.
by Daft TeamPyTorch's DataLoader is a utility that plays a critical role in deep learning pipelines. It takes a dataset and wraps it with an iterable that can efficiently load data in batches, shuffle data each epoch, and utilize parallel workers for speed. In other words, the DataLoader is responsible for feeding your model with mini-batches of data during training.
This article provides a hands-on overview of using PyTorch DataLoaders with various data modalities, including tabular data, textual data, and image data, to illustrate how the DataLoader handles each data type. We also discuss the limitations of PyTorch's built-in DataLoader when scaling up or handling more complex scenarios, and introduce a library called Daft, which offers additional benefits for loading data for training pipelines.
| Concept | Description |
|---|---|
| PyTorch DataLoader | A PyTorch utility that wraps a PyTorch Dataset (or other data source) and creates an iterable over data samples that can be used for training deep learning models. |
| DataLoader features | Automatic batching of samples into tensors, parallel data loading using Python multiprocessing (num_workers), optional pinned memory for faster GPU transfer, custom collation for dynamic batch prep (e.g., padding sequences), and support for both indexed list style and iterable data sets. |
| Dataset vs. DataLoader | A Dataset in PyTorch loads data from map and iter style data sources, typically applying any per-sample transformations. The DataLoader orchestrates how those samples are accessed, managing iteration logic, parallelism, batching, and shuffling. |
| Multimodal data loading | PyTorch DataLoaders are agnostic to data modality. They can handle tabular numeric data, text (sequences of tokens), images (tensors of pixel values), audio, video (temporal data), sparse data, etc. |
| Common DataLoader drawbacks | For very large data sets or complex data sources, the standard DataLoader can become a bottleneck. It struggles with I/O throughput on large data sets, requires custom code to handle multi-modal data or data stored in the cloud, uses separate worker processes that lead to duplicated memory usage, and lacks support for distributed multi-machine loading and advanced data filtering/joining logic. |
| Advanced data loading utilities | Advanced data loading utilities such as Daft retain the familiar DataLoader interface but offer features like lazy loading, optimized vectorized operations in Rust, seamless cloud data access, and distributed data pipeline support. |
What is a PyTorch DataLoader?
In PyTorch, a DataLoader serves as the workhorse for loading data for model training. It is implemented as a Python class in the torch.utils.data module. It takes a Dataset object and creates an iterator that yields batches of data (typically, batches of tensors) for each training step.
Under the hood, the DataLoader combines several important functions.
Automatic batching
You specify a batch_size parameter, and the DataLoader combines that many samples into each batch. Instead of manually aggregating data, you can iterate directly over batches.
For example, if batch_size=32, each iteration yields 32 samples packed into tensors (e.g., a tensor of shape (32, ...) for features, and (32, ...) for labels). A tensor is a multi-dimensional array that PyTorch uses to store and manipulate numerical data.
Shuffling data
You can set shuffle=True when creating the DataLoader (typically for the training set), PyTorch shuffles the data indices at the start of each epoch. This ensures the model sees data in a different order every epoch, which typically leads to better generalization. The shuffling is done in a way that all samples are seen once per epoch (just in random order).
Parallel data loading
DataLoader utilizes Python multiprocessing to expedite data loading. The num_workers parameter controls the number of subprocesses spawned to fetch data. With num_workers > 0, each worker loads a portion of the data in parallel. For example, if you have heavy image augmentations or slow disk I/O, using four workers can substantially reduce data loading bottlenecks by preparing multiple batches concurrently.
There is a sweet spot for num_workers depending on your CPU cores and data source. Too many workers can cause performance overheads in competition for disk access, but the right number can hide almost all data loading time behind model computation.
Collate function for custom batching
By default, DataLoader collates (combines) samples by stacking tensors of the same shape or collecting them into lists. However, you can provide a custom value for collate_fn. This is extremely useful, for instance, when dealing with text sequences of varying lengths. You can write a collate function that pads all sequences in a batch to the same length. It is also helpful in creating batches of complex data structures (e.g., combining dictionaries of tensors, or handling multimodal data with varying types).
Pin memory
Setting pin_memory=True for a DataLoader when copying batches to the GPU improves transfer speed. Pinned memory is a page-locked memory, which is locked in physical memory and cannot be swapped to disk. It accelerates host-to-device transfers (e.g., CPU to GPU). In practice, if you're training on a GPU, enabling pinned memory in DataLoader is a common tweak to boost throughput.
Indexed list and iterable datasets
The DataLoader is flexible. You can use it with:
- Indexed list style datasets that are indexed by an integer and return one item
- Iterable datasets that yield items sequentially without a specified size.
If using an indexed list style approach, the DataLoader utilizes random sampling or distributed sampling; if using an iterable, it simply iterates through the data until exhausted. This means you can create streaming datasets, such as reading from an extensive CSV line by line, and still plug them into DataLoader.
Mixed modality batches
A single DataLoader returns batches that contain multiple data types. For example, your Dataset could return a tuple like (image_tensor, text_tensor, label). The DataLoader's collate will handle grouping each of those elements across the batch. It forms a batch of images, a batch of text tensors, and a batch of labels. PyTorch doesn't restrict what the Dataset returns, as long as the collate function knows how to combine them. This allows you to get very creative with your data structures.
Overall, PyTorch DataLoaders provide a clean, high-level interface for model training loops. Instead of writing boilerplate to read files, batch them, shuffle indices, etc., you configure a DataLoader and then in your training loop simply do something like:
for batch in train_loader:
    # batch will be (inputs, labels) for example
    out = model(batch[0])
    loss = compute_loss(out, batch[1])
    ...
The DataLoader handles all the heavy lifting behind the scenes to ensure that the batch contains the right data in the right shape when you need it.
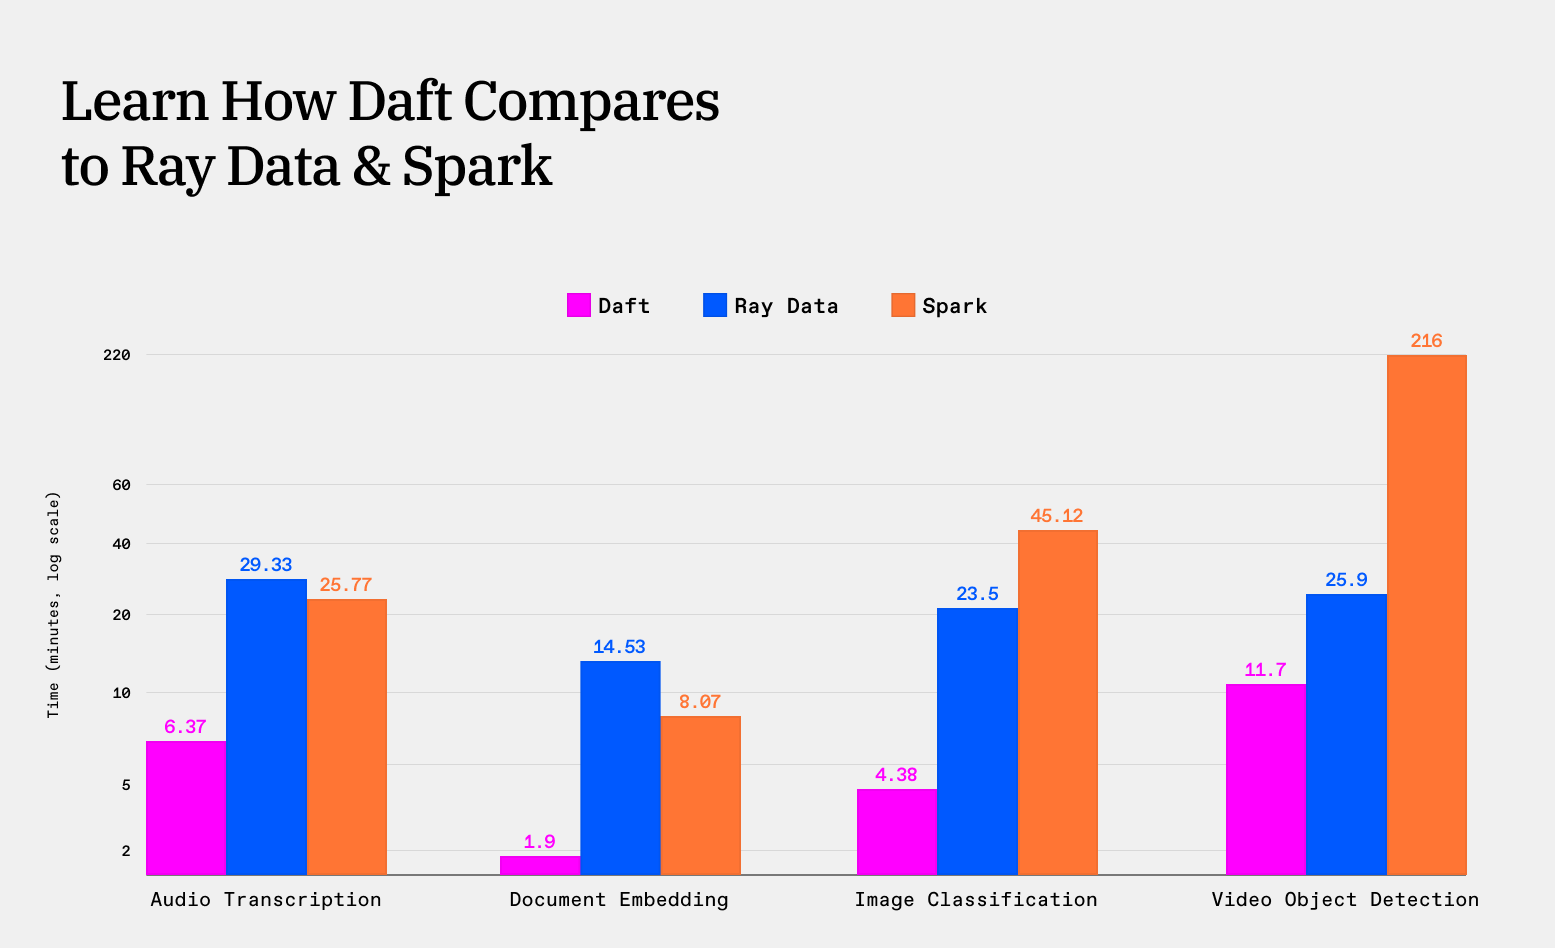
LEARN MORE: Benchmarks for Multimodal AI Workloads
Relationship between PyTorch Dataset and DataLoader
The DataLoader orchestrates the retrieval and assembly of data, while the Dataset provides the data content.
Dataset
The Pytorch Dataset is an abstract class packaged in the torch.utils.data module. You either subclass to create custom data sets or use one of PyTorch's many provided Dataset implementations, such as torchvision.datasets.ImageFolder or torchtext datasets.
PyTorch supports two different kinds of datasets: map-style and iterator-style. The Dataset class provides a way to retrieve a single data sample from either type, but the mechanics differ and consequently the function that the Dataset class implements also differs.
Map-style datasets implement __getitem__ and __len__, making them behave like indexable collections such as Python lists. Each sample is accessed directly by its index, and workers can independently fetch their assigned samples. This design works very well when data is local and random access is cheap, since you can shuffle globally, resample endlessly, and create random batches efficiently. The drawback is that for very large or remote datasets, for example, millions of files stored in S3, random index-based sampling can become prohibitively expensive, as each worker or machine may end up fetching scattered objects across the network.
On the other hand, Iterator-style datasets implement __iter__ instead of __getitem__. Rather than indexing, they yield samples in sequence, making them a natural fit for streaming data, unbounded logs, or sources that can't be randomly indexed efficiently (such as APIs or object stores). However, splitting iterator-style datasets across distributed workers requires extra effort, since each worker must be assigned a deterministic shard of the stream. A drawback is that you can't simply reshuffle data at every epoch because there's no inherent indexing. Instead, practitioners typically use a shuffle buffer, a sliding window of samples loaded into memory, to inject randomness before yielding batches. This approach works, but it's more complex to manage than the simplicity of global shuffling with map-style datasets.
DataLoader
The DataLoader class also resides in the torch.utils.data module. It wraps a Dataset and provides an iterator over the Dataset's samples as specified. It doesn't know about the content of each sample, but it knows how to access indices from the Dataset and how to collate them into batches. When you iterate over a DataLoader, its internal operations include:
- Drawing a batch of indices. If shuffle is enabled, these indices are randomized; if using multiple workers, the indices are split among workers.
- Calling
dataset[idx]for each index, possibly in parallel in multiple workers - Collecting the returned samples (tuples of various elements) into a list.
- Passing that list to the collate function to produce a batch (e.g., stacking tensors).
- Yielding the batch to your loop.
It repeats the above for every batch until it has covered the whole dataset (one epoch).
Using PyTorch DataLoader with tabular data
To demonstrate the use of DataLoader for tabular data, we create a simple PyTorch neural network for predicting house prices using a Kaggle dataset.
Note: The codes in this article are executed in a Google Colab notebook.
Import the following libraries:
import pandas as pd
import numpy as np
from sklearn.model_selection import train_test_split
from sklearn.preprocessing import LabelEncoder, StandardScaler
import torch
import torch.nn as nn
from torch.utils.data import Dataset, DataLoader
Run the following script to import the dataset into a Pandas DataFrame.
dataset = pd.read_csv("/content/Housing.csv")
dataset.head()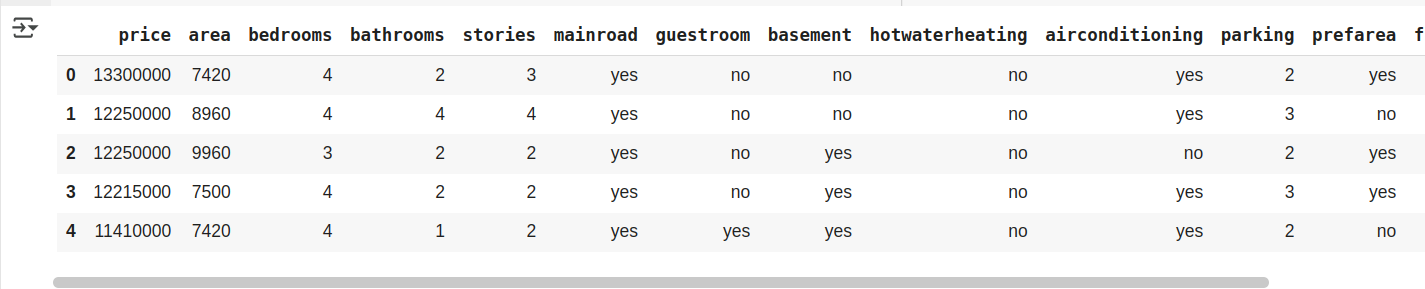
Preprocess the dataset.
## converting categorical columns to numeric ones

categorical_cols = ['mainroad', 'guestroom', 'basement', 'hotwaterheating',
                    'airconditioning', 'prefarea', 'furnishingstatus']

label_encoders = {}
for col in categorical_cols:
    le = LabelEncoder()
    dataset[col] = le.fit_transform(dataset[col])
    label_encoders[col] = le

## spliting features and labels

X = dataset.drop(columns=['price'])
y = dataset['price'].values

## train test splits
X_train, X_test, y_train, y_test = train_test_split(X, y, test_size=0.2, random_state=42)


## data normalization
numeric_cols = ['area', 'bedrooms', 'bathrooms', 'stories', 'parking']
scaler = StandardScaler()
X_train[numeric_cols] = scaler.fit_transform(X_train[numeric_cols])
X_test[numeric_cols] = scaler.transform(X_test[numeric_cols])

## convert DataFrames to numpy arrays

X_train_np = X_train.values.astype(np.float32)
X_test_np = X_test.values.astype(np.float32)

### normalize the target price

y_mean = y_train.mean()
y_std = y_train.std()

y_train_norm = ((y_train - y_mean) / y_std).astype(np.float32)
y_test_norm = ((y_test - y_mean) / y_std).astype(np.float32)
The next step is to create a PyTorch dataset using the DataSet class.
class HousePriceDataset(Dataset):
    def __init__(self, features, labels):
        self.X = torch.tensor(features, dtype=torch.float32)
        self.y = torch.tensor(labels, dtype=torch.float32).view(-1, 1)  # Make it (N, 1)

    def __len__(self):
        return len(self.y)

    def __getitem__(self, idx):
        return self.X[idx], self.y[idx]

train_dataset = HousePriceDataset(X_train_np, y_train_norm)
test_dataset = HousePriceDataset(X_test_np, y_test_norm)
The custom DataSet class above simply returns the features and labels without performing any additional transformations.
Wrap the custom dataset in a PyTorch loader:
train_loader = DataLoader(train_dataset, batch_size=8, shuffle=True)
test_loader = DataLoader(test_dataset, batch_size=8)
The DataLoader is iterable and returns data in batches of 8 records, as specified in the above script. You can verify it by running the following code:
for batch_idx, (features, labels) in enumerate(test_loader):
    print(f"Batch {batch_idx+1}")
    print("Features:\n", features)
    print("Labels:\n", labels)
    break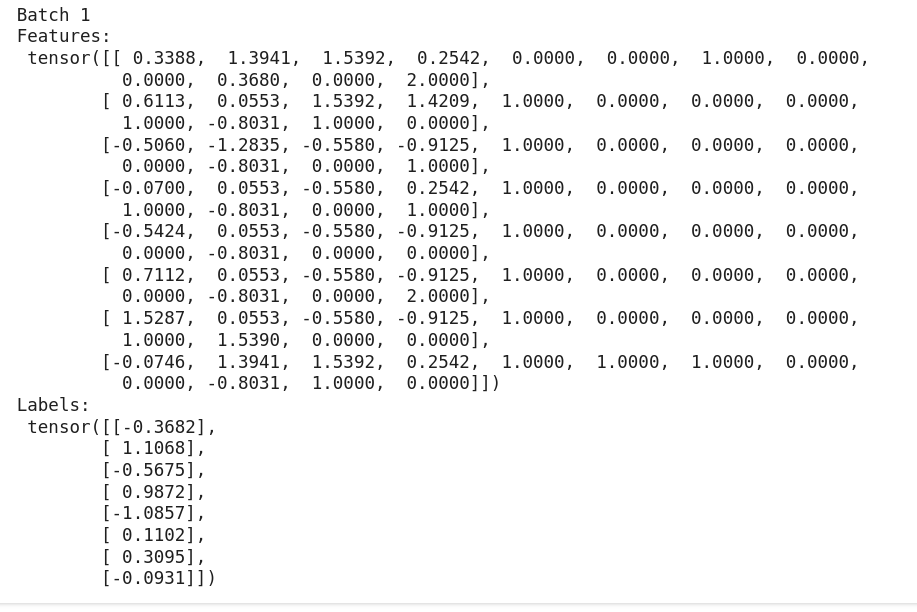
Once you have an iterable that loads data in batches, you can perform any task on it. For example, use the script below to train a house price prediction model.
class HousePriceModel(nn.Module):
    def __init__(self, input_dim):
        super().__init__()
        self.model = nn.Sequential(
            nn.Linear(input_dim, 64),
            nn.ReLU(),
            nn.Linear(64, 32),
            nn.ReLU(),
            nn.Linear(32, 1)
        )

    def forward(self, x):
        return self.model(x)

device = torch.device("cuda" if torch.cuda.is_available() else "cpu")
input_dim = X_train_np.shape[1]
model = HousePriceModel(input_dim).to(device)

criterion = nn.MSELoss()
optimizer = torch.optim.Adam(model.parameters(), lr=0.001)
The script below trains the model for 5 epochs.
num_epochs = 100

for epoch in range(num_epochs):
    model.train()
    running_loss = 0.0
    for batch_X, batch_y in train_loader:
        batch_X, batch_y = batch_X.to(device), batch_y.to(device)

        preds = model(batch_X)
        loss = criterion(preds, batch_y)

        optimizer.zero_grad()
        loss.backward()
        optimizer.step()

        running_loss += loss.item()

    avg_loss = running_loss / len(train_loader)
    if (epoch + 1) % 10 == 0 or epoch == 0:
        print(f"Epoch [{epoch+1}/{num_epochs}], Loss: {avg_loss:.2f}")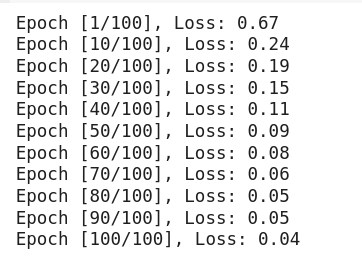
Finally, you can evaluate the model on the test set:
model.eval()
with torch.no_grad():
    test_losses = []
    for batch_X, batch_y in test_loader:
        batch_X, batch_y = batch_X.to(device), batch_y.to(device)

        preds = model(batch_X)

        loss = criterion(preds, batch_y)
        test_losses.append(loss.item())

    avg_test_loss = sum(test_losses) / len(test_losses)
    print(f"\nTest MSE: {avg_test_loss:,.2f}")
Output:
Test MSE: 0.61
Note: The above output doesn't reflect the best model performance. You can optimize the model further. The idea here is to demonstrate how DataLoader loads data in batches, utilizing shuffling and parallelization with workers.
Using PyTorch DataLoader with text data
We train a text classification model on the IMDB sentiment dataset from Kaggle. The BERT model extracts embeddings from text reviews and passes the embeddings to downstream neural network layers for training.
The following script imports the Bert model and tokenizer from Hugging Face.
from transformers import BertTokenizer, BertModelThe script below imports the dataset.
dataset = pd.read_csv("/content/imdb_test.csv")
dataset = dataset[['text', 'label']].dropna()
dataset.head()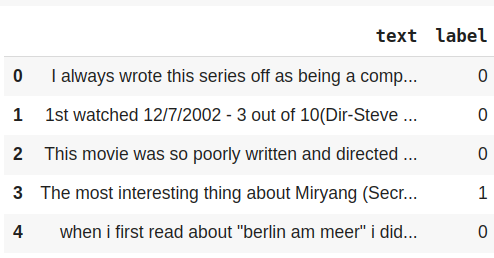
Divide the dataset into train and test sets, and into feature and label sets.
X_train, X_test, y_train, y_test = train_test_split(dataset['text'], dataset['label'], test_size=0.2, random_state=42)

X_train = X_train.reset_index(drop=True)
X_test = X_test.reset_index(drop=True)
y_train = y_train.reset_index(drop=True)
y_test = y_test.reset_index(drop=True)
Next, define a DataSet class that accepts text strings and labels, as well as the BERT tokenizer.
The __getitem__() function tokenizes the text using the BERT tokenizer and returns input ids and attention mask, and the corresponding label. You can perform all sorts of transformations in the __getitem__() function.
class IMDBDataset(Dataset):
    def __init__(self, texts, labels, tokenizer, max_length=128):
        self.texts = texts
        self.labels = labels
        self.tokenizer = tokenizer
        self.max_length = max_length

    def __len__(self):
        return len(self.texts)

    def __getitem__(self, idx):
        encodings = self.tokenizer(
            self.texts[idx],
            truncation=True,
            padding='max_length',
            max_length=self.max_length,
            return_tensors='pt'
        )
        input_ids = encodings['input_ids'].squeeze(0)
        attention_mask = encodings['attention_mask'].squeeze(0)
        label = torch.tensor(self.labels[idx], dtype=torch.float)
        return input_ids, attention_mask, label

train_dataset = IMDBDataset(X_train, y_train, tokenizer)
test_dataset = IMDBDataset(X_test, y_test, tokenizer)
The following script defines the DataLoaders for training and test sets. It resembles the one used for creating tabular data loaders. You can see that the DataLoader is modality agnostic and has no impact on how the data is transformed. It merely performs the task of shuffling, batching, parallelization, and feeding data for training.
num_workers = 2
pin_memory = torch.cuda.is_available()

train_loader = DataLoader(train_dataset,
                          batch_size=16,
                          shuffle=True,
                          num_workers=num_workers,
                          pin_memory=pin_memory)

test_loader = DataLoader(
    test_dataset,
    batch_size=16,
    shuffle=False,
    num_workers=num_workers,
    pin_memory=pin_memory
)
Next, you can define the sentiment classification model. The input IDs and attention mask returned by the tokenizer are passed to the BERT model, which returns text embeddings. These embeddings are passed to the downstream neural network layer for training.
class BERTSentimentClassifier(nn.Module):
    def __init__(self, bert_model):
        super().__init__()
        self.bert = bert_model
        self.classifier = nn.Sequential(
            nn.Linear(768, 128),
            nn.ReLU(),
            nn.Linear(128, 1),
            nn.Sigmoid()
        )

    def forward(self, input_ids, attention_mask):
        with torch.no_grad():
            outputs = self.bert(input_ids=input_ids, attention_mask=attention_mask)
            pooled_output = outputs.pooler_output
        return self.classifier(pooled_output).squeeze(-1)
The following script trains the model on the training set.
device = torch.device("cuda" if torch.cuda.is_available() else "cpu")

bert_model = BertModel.from_pretrained('bert-base-uncased')
model = BERTSentimentClassifier(bert_model).to(device)

criterion = nn.BCELoss()
optimizer = torch.optim.Adam(model.classifier.parameters(), lr=0.001)

for epoch in range(10):
    model.train()
    running_loss = 0.0
    for input_ids, attention_mask, labels in train_loader:
        input_ids = input_ids.to(device)
        attention_mask = attention_mask.to(device)
        labels = labels.to(device)

        outputs = model(input_ids, attention_mask)
        loss = criterion(outputs, labels)

        optimizer.zero_grad()
        loss.backward()
        optimizer.step()

        running_loss += loss.item()

    print(f"Epoch [{epoch+1}/10], Loss: {running_loss / len(train_loader):.4f}")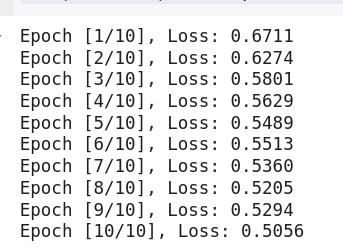
And the script below evaluates the model.
model.eval()
correct = 0
total = 0

with torch.no_grad():
    for input_ids, attention_mask, labels in test_loader:
        input_ids = input_ids.to(device)
        attention_mask = attention_mask.to(device)
        labels = labels.to(device)

        outputs = model(input_ids, attention_mask)
        predictions = (outputs > 0.5).float()
        correct += (predictions == labels).sum().item()
        total += labels.size(0)

print(f"Accuracy: {100 * correct / total:.2f}%")
Output:
Accuracy: 78.00%
Using PyTorch DataLoader with image data
We train an image classification model on the Cats and Dogs dataset from Kaggle, which predicts whether an image contains a cat or a dog. While it may seem like a simplistic problem, the code provides extensive detail on how PyTorch loads image datasets and how DataLoader processes them.
PyTorch provides torchvision.datasets module that you can use to load images from various sources into a PyTorch dataloader.
from google.colab import files
import kagglehub
from torchvision import datasets, models, transforms
from torch.utils.data import IterableDataset
Import the Kaggle dataset into a Google Colab notebook, as shown in the following script.
!mkdir -p ~/.kaggle
!cp kaggle.json ~/.kaggle/
!chmod 600 ~/.kaggle/kaggle.json
path = kagglehub.dataset_download("tongpython/cat-and-dog")
print("Path to dataset files:", path)
!kaggle datasets download -d "tongpython/cat-and-dog"
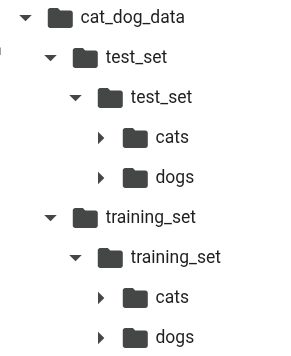
!unzip cat-and-dog.zip -d cat_dog_dataAfter downloading the dataset, you should have the following directory structure.
Apply some transformations to the image to improve the training accuracy of your model.
transform = transforms.Compose([
    transforms.Resize((224, 224)),
    transforms.ToTensor(),
    transforms.Normalize(mean=[0.485, 0.456, 0.406],  # ImageNet means
                         std=[0.229, 0.224, 0.225])    # ImageNet stds
])
Next, you can use the datasets.ImageFolder class to import training and test datasets as PyTorch datasets and pass them into the PyTorch DataLoader. Once again, the DataLoader is not aware of the data's structure and content. Its job is to feed data to train PyTorch models after applying techniques such as shuffling, batching, and parallelization.
train_path = "/content/cat_dog_data/training_set/training_set"
test_path = "/content/cat_dog_data/test_set/test_set"

train_dataset = datasets.ImageFolder(train_path, transform=transform)
test_dataset = datasets.ImageFolder(test_path, transform=transform)

train_loader = DataLoader(train_dataset, batch_size=32, shuffle=True, num_workers=2, pin_memory=True)
test_loader = DataLoader(test_dataset, batch_size=32, shuffle=False, num_workers=2, pin_memory=True)
The rest of the process is straightforward. Fine-tune the ResNET50 model to create the image classification model. The script below defines the model.
class ResNetFineTuned(nn.Module):
    def __init__(self, num_classes=2):
        super().__init__()

        # Load pretrained ResNet50
        base_model = models.resnet50(pretrained=True)

        # Freeze all layers
        for param in base_model.parameters():
            param.requires_grad = False

        # Dynamically unfreeze the last 4 top-level layers
        last_layers = list(base_model.children())[-5:]  # Includes layer1 to fc
        for layer in last_layers:
            for param in layer.parameters():
                param.requires_grad = True

        # Replace final classifier layer
        in_features = base_model.fc.in_features
        base_model.fc = nn.Linear(in_features, num_classes)

        self.model = base_model

    def forward(self, x):
        return self.model(x)
The following script trains the model on the dataset.
device = torch.device("cuda" if torch.cuda.is_available() else "cpu")
model = ResNetFineTuned(num_classes=2).to(device)

criterion = nn.CrossEntropyLoss()
optimizer = torch.optim.Adam(filter(lambda p: p.requires_grad, model.parameters()), lr=1e-4)

num_epochs = 5

for epoch in range(num_epochs):
    model.train()
    running_loss = 0.0
    correct = 0
    total = 0

    for images, labels in train_loader:
        images = images.to(device)
        labels = labels.to(device)

        outputs = model(images)
        loss = criterion(outputs, labels)

        optimizer.zero_grad()
        loss.backward()
        optimizer.step()

        running_loss += loss.item()
        _, predicted = torch.max(outputs, 1)
        correct += (predicted == labels).sum().item()
        total += labels.size(0)

    print(f"Epoch [{epoch+1}/{num_epochs}], "
          f"Loss: {running_loss/len(train_loader):.4f}, "
          f"Accuracy: {100*correct/total:.2f}%")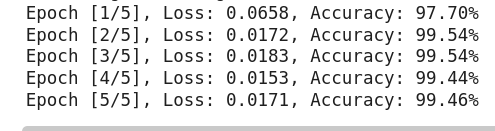
Finally, the script below evaluates the model.
model.eval()
correct = 0
total = 0

with torch.no_grad():
    for images, labels in test_loader:
        images = images.to(device)
        labels = labels.to(device)

        outputs = model(images)
        _, predicted = torch.max(outputs, 1)
        correct += (predicted == labels).sum().item()
        total += labels.size(0)

print(f"\nTest Accuracy: {100 * correct / total:.2f}%")
Output:
Test Accuracy: 99.01%
The above examples show that PyTorch DataLoader can work with virtually any data type, as long as it receives the features and labels via the __getitem__() or __iter__() items of the DataSet or IterableDataset classes. You can work with video, time series, or even point cloud datasets using the same abstraction.
Limitations of default PyTorch DataLoaders
So far, we've seen how flexible and convenient DataLoaders are for different scenarios. However, as your projects scale up, you encounter some challenges.
I/O bottlenecks at scale
When dealing with millions of samples or extremely large datasets (e.g., terabytes of images), the Python-based DataLoader may become a bottleneck. Each sample retrieval goes through Python, and possibly other multiple processes. While multiple workers can alleviate this by parallelizing data loading, beyond a certain point, you might see diminishing returns or even slowdowns.
Setting up and managing a parallel network I/O becomes highly complex when working with massive datasets, especially those stored remotely. In an ideal scenario, you would design a pipeline where data retrieval from cloud storage, preprocessing, loading, and downstream processing are executed in parallel. PyTorch dataloaders, by default, do not provide any such functionality to perform all these tasks concurrently in a multithreaded environment.
Memory duplication in workers
The way PyTorch DataLoader works with multiple workers, leads to data copying, especially on Linux with the fork start method. If you have a very large in-memory Dataset and spawn multiple workers, you would run out of RAM because each worker replicates that data. There are ways to work around this:
- Use shared memory constructs or memory-mapped files
- Designing the Dataset to hold only minimal state
However, it's a challenge to be aware of.
When using multiple workers in PyTorch's DataLoader (num_workers > 0), each worker process creates a different copy of the Dataset object. You must carefully configure each worker's dataset to avoid having duplicate data returned from the workers.
Another source of memory duplication comes when moving data between frameworks. For example, preprocessing data in Spark and then exporting to Pandas before feeding it into PyTorch can be challenging since Spark and PyTorch use different memory layouts internally. These transitions can inflate memory usage, and at large scales, they become an essential factor to watch.
Handling complex multimodal pipelines
Consider scenarios like you have images and need to join them with metadata from a CSV, or you have data pairs that come from different files. If your model requires multiple data sources to be combined, the DataLoader won't perform this joining for you out of the box. It essentially assumes a single dataset that yields all the necessary information for a sample.
In order to make DataLoader work with multimodal data, you will have to write custom code with components dealing with multimodalities and merging them. You might end up preprocessing and merging data offline to fit into that mold.
Limited support for cloud storage
Out of the box, DataLoader doesn't have special support for loading from cloud object stores, such as S3, Google Cloud Storage, etc. You can do it -- e.g., in your Dataset's __getitem__, you might use requests or a cloud SDK to fetch data from a URL, but this will likely be slow and not take advantage of parallelism properly.
Lack of distributed coordination
If you want to scale out training across multiple machines and not just multiple GPUs on one machine, but multiple separate nodes, PyTorch's DistributedDataParallel helps with model synchronization. However, the data loading part is left to you to coordinate. You may need an external data orchestration solution, such as using a library like Ray or Spark/Petastorm to distribute data loading.
Debugging and error handling
When using multiple workers, if one of them crashes, for example, due to a bad data sample causing an exception, the entire DataLoader can crash with cryptic errors. Debugging within the __getitem__ method across processes can be challenging. Sometimes you have to set num_workers=0 to debug, then turn it back on. This isn't a limitation, but a usability pain point to be aware of.
To summarize, PyTorch DataLoader is fundamental and works well for a large range of use cases. But when pushing the envelope in terms of dataset size, storage location, or complexity of data processing, you might find yourself writing a lot of custom code or encountering performance issues.
This has led to the development of alternative solutions to complement the default DataLoader in those scenarios. Next, we'll examine one such solution -- Daft -- and how it aims to address some of these issues while integrating into PyTorch workflows.
Daft for efficient data loading in PyTorch
Daft is a Rust-powered high-performance distributed query engine for large-scale data processing tasks. Daft supports multimodal-type columns (images, URLs, tensors), uses Apache Arrow as its in-memory format, and integrates with data catalogs and cloud storage.
Daft is super-easy to integrate with PyTorch data loading. The goal of Daft is to retain the ease of use of PyTorch's DataLoader interface while overcoming some of the limitations discussed. Here's how Daft helps:
Lazy loading with query optimization
Daft employs a lazy evaluation model. You can instruct it to read a dataset and select only certain columns or filter specific rows, and it will only load the data needed for the operations you specify. For example, if you have a dataset with 100 columns but your model only needs 5 of them, Daft can avoid reading the other 95 columns from disk entirely, reducing I/O operations.
Vectorized Rust execution
Under the hood, Daft is built in Rust (with Python bindings). This means it can utilize low-level optimizations and execute computations outside of Python's Global Interpreter Lock (GIL). Tasks like image decoding, resizing, or data transformations can be parallelized across all CPU cores very efficiently in native code.
Intelligent pipeline parallelism
A big advantage comes when dealing with remote data (cloud storage) or any scenario where I/O and CPU processing need to overlap. Daft understands the stages of the data pipeline (e.g., download file from S3 is one stage, decode image is another stage, apply augmentation is another). It can then pipeline these stages and tune each stage's parallelism.
Native cloud storage support
Daft can directly read from sources like Amazon S3, Google Cloud Storage, Azure Blob, or even HTTP/HTTPS, with minimal configuration. It abstracts the credentials and API, so you can do something like daft.read_csv("s3://bucket/path/to/data.csv") or daft.read_parquet("s3://...") and it will handle the connections, authentication, etc., seamlessly. Daft has demonstrated record-setting performance when reading from and writing data to these cloud storage platforms.
Multimodal data handling
Unlike typical DataFrames that only handle numeric/tabular data, Daft supports columns that are images, tensors, or other complex types. For example, Daft can treat an image column as a first-class type, and you can call methods like decode_image() or resize() as part of your data pipeline, without manually writing the image processing code for each sample. It also supports nested data (structs, lists), which can be useful for applications such as bounding box labels in object detection.
Integration with PyTorch (and others)
Daft isn't tied to PyTorch only -- it's more general -- but it provides an easy way to go from a Daft DataFrame to a PyTorch Dataset/DataLoader. It can produce a PyTorch IterableDataset that yields data from the Daft pipeline. This means you can slot it into your training loop with minimal changes.
Daft PyTorch training example
In this section, we create the PyTorch cats and dog classification model but this time we load data from a Daft dataframe instead of loading it directly from the disk.
The following script installs the daft Python library. You will also need to install torchdata library as the Daft iterator internally calls it.
!pip install daft
!pip install torchdata==0.7.1
import daft
from daft import DataType
import types, sys
import torchdata.datapipes as _dp
from PIL import Image
from torchvision.transforms.functional import normalizeNext, create a Daft dataframe by loading data from the data folders. To do so, you can use the from_glob_path function. You can also load data from other sources. Refer to the Daft documentation for additional information.
train_df = daft.from_glob_path("/content/cat_dog_data/training_set/training_set/*/*.*")
test_df = daft.from_glob_path("/content/cat_dog_data/test_set/test_set/*/*.*")
train_df.show()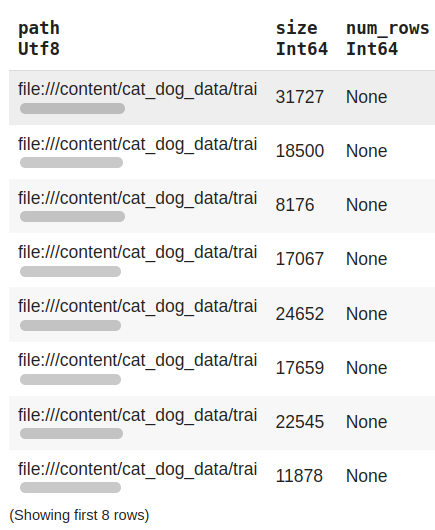
The above screenshot illustrates how a Daft dataframe appears when loading data from a folder. It has, by default, added columns such as path and size.
You can apply various transformations to different types of data within the Daft dataframe. The script below adds a label column from the path file, the image_bytes column from the image and the image column that displays the image. In Daft, you can use the with_column function to add new columns.
def extract_label(path: str) -> int:
    return 0 if "cats" in path else 1

## add data labels
train_df = train_df.with_column(
    "label",
    train_df["path"].apply(lambda path: extract_label(path), return_dtype=DataType.int64())
)

test_df = test_df.with_column(
    "label",
    test_df["path"].apply(lambda path: extract_label(path), return_dtype=DataType.int64())
)

## add image bytes
train_df = train_df.with_column("image_bytes", train_df["path"].url.download(on_error="null"))
test_df = test_df.with_column("image_bytes", test_df["path"].url.download(on_error="null"))


## render image
train_df = train_df.with_column("image", train_df["image_bytes"].decode_image())
test_df = test_df.with_column("image", test_df["image_bytes"].decode_image())

train_df.show()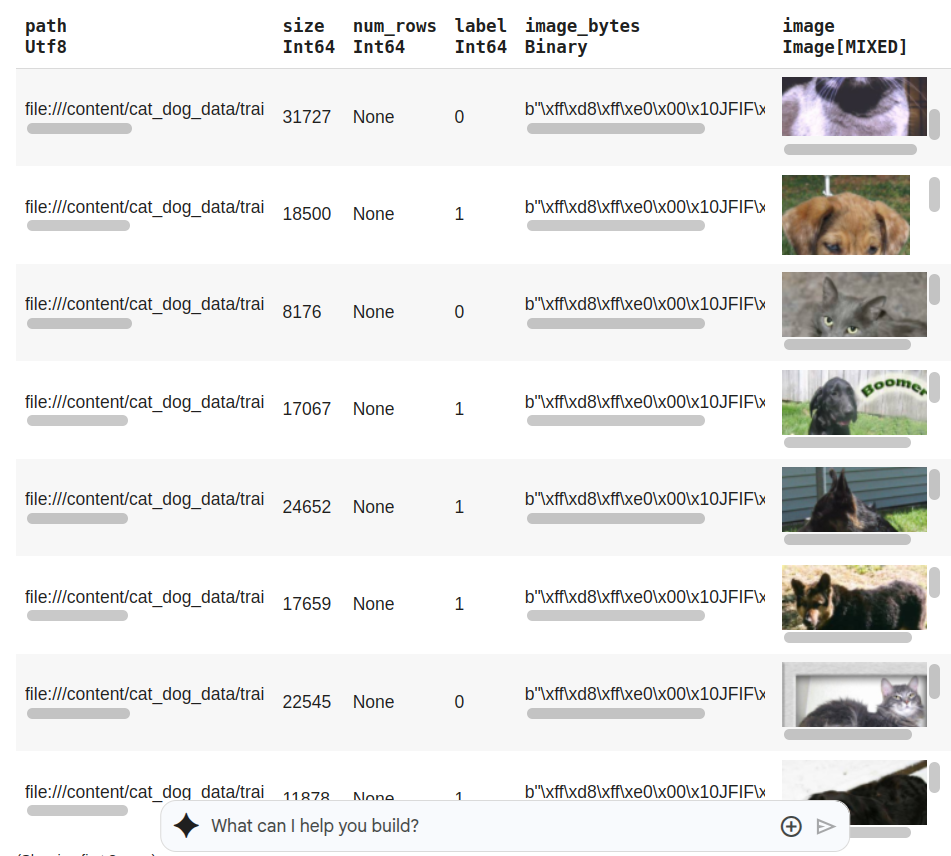
From the above image, you can see the image and byte data within a DataFrame. If you have worked with Pandas DataFrame, you would know that this is not possible with Pandas.
Next, call the to_torch_iter_dataset function, which converts the Daft dataframe into an iterator that the DataLoader can use.
# Only patch if the submodules are missing
if not hasattr(_dp, "map"):
    _dp.map  = types.ModuleType("map")
    _dp.iter = types.ModuleType("iter")
    _dp.map.MapDataPipe   = _dp.MapDataPipe
    _dp.iter.IterDataPipe = _dp.IterDataPipe

    sys.modules["torchdata.datapipes.map"]  = _dp.map
    sys.modules["torchdata.datapipes.iter"] = _dp.iter

print("torchdata patched for Daft compatibility")

train_iter = (
    train_df.select("path", "label")
            .to_torch_iter_dataset()
)

test_iter = (
    test_df.select("path", "label")
           .to_torch_iter_dataset()
)
The rest of the process is similar to before. However, since now you have a Daft iterator, you can create an object of the IterableDataset class instead of the Dataset class previously used. The data loading and processing occurs within the __iter__() function.
Define DataLoader and pass it the train_dataset and test_dataset objects of the DaftPathStream class.
tfm = transforms.Compose([
    transforms.Resize(256),
    transforms.CenterCrop(224),
    transforms.ToTensor(),                                # [0,1]
    transforms.Normalize([0.485, 0.456, 0.406],           # ImageNet
                         [0.229, 0.224, 0.225]),
])


class DaftPathStream(IterableDataset):

    def __init__(self, datapipe, transform=None):
        self.datapipe  = datapipe    # the Daft iterator
        self.transform = transform or (lambda x: x)

    def __iter__(self):
        for row in self.datapipe:                # lazy row from Daft
            img_path = row["path"].replace("file://", "")
            img      = Image.open(img_path).convert("RGB")
            img      = self.transform(img)
            label    = row["label"]
            yield img, label


train_dataset = DaftPathStream(train_iter, transform=tfm)
test_dataset = DaftPathStream(test_iter , transform=tfm)

train_loader = DataLoader(train_dataset, batch_size=32,  pin_memory=True)
test_loader = DataLoader(test_dataset, batch_size=32, pin_memory=True)
Next, train the ResNetFineTuned model defined in the previous section. Use the DataLoaders that wrap the DaftPathStream class objects.
model = ResNetFineTuned(num_classes=2).to(device)

criterion  = nn.CrossEntropyLoss()
optimizer  = torch.optim.Adam(
    filter(lambda p: p.requires_grad, model.parameters()), lr=1e-4
)

num_epochs = 5

for epoch in range(num_epochs):
    model.train()
    running_loss = 0.0
    correct      = 0
    total        = 0
    batches      = 0

    for images, labels in train_loader:
        images, labels = images.to(device), labels.to(device)

        optimizer.zero_grad()
        outputs = model(images)
        loss    = criterion(outputs, labels)
        loss.backward()
        optimizer.step()

        running_loss += loss.item()
        batches      += 1

        _, predicted = outputs.max(1)
        correct += (predicted == labels).sum().item()
        total   += labels.size(0)

    avg_loss = running_loss / batches
    acc      = 100 * correct / total
    print(f"Epoch {epoch+1}/{num_epochs}  |  loss {avg_loss:.4f}  |  acc {acc:.2f}%")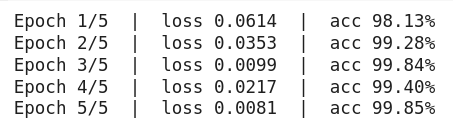
Finally, the script below evaluates the trained model on the test set.
model.eval()
correct = 0
total = 0

with torch.no_grad():
    for images, labels in test_loader:
        images = images.to(device)
        labels = labels.to(device)

        outputs = model(images)
        _, predicted = torch.max(outputs, 1)
        correct += (predicted == labels).sum().item()
        total += labels.size(0)

print(f"\nTest Accuracy: {100 * correct / total:.2f}%")
Output:
Test Accuracy: 98.52%
Final thoughts
The PyTorch DataLoader, in combination with custom Dataset classes, is a fundamental tool that every PyTorch practitioner uses. However, as with many defaults, the standard DataLoader has its limitations when faced with scale and complexity. In such cases, solutions like Daft come into play. Daft provides an attractive proposition: keep the ease of PyTorch's data iteration, but turbo-charge it with an optimized engine that handle lazy loading, cloud data, multimodal transformations, and distribution.
The main takeaway is that if you're working on a Kaggle-sized dataset on a single machine, PyTorch DataLoader is probably all you need -- it's simple and effective. If you're working at the scale of millions of images stored on the cloud and training on a multi-GPU cluster, invest time in a more robust data pipeline, such as Daft.

